Shelter Gifts - A Ruby on Rails Project
A Ruby on Rails Application created as a project in the Flatiron Software Engineering program
For my first Ruby on Rails project (my third project for Flatiron), I created Shelter Gifts. I came up with the idea for the app several months ago, well before reaching the Ruby on Rails section in the curriculum. I started following DHH on Twitter a while back because I was looking forward to learning Ruby on Rails and he created it! Well, in February he retweeted something from Ryan Singer that stuck with me:
If you observe solution space, markets are crowded and opportunities are scarce. If you observe problem space, markets are sparse with vast amounts of free space around each data point. Ryan Singer
That got me thinking: what are some problem spaces that I could address? What areas could I help in and where? That changed from what and where to who. Who are the people in problem spaces? Who are some people with problems? Everyone has problems. Who are the people with some of the biggest problems? People that are homeless.
Now that I had an area to focus on, how could I help? My thought process was, Well, what do they need? I could guess that things like clothing, and food are needed, but that was too broad. I could ask some of them directly, but that seemed inefficient and wouldn't scale. Besides, how would I get the items to them? Ah ha! I could have the item sent to homeless shelters! Better yet, why not just ask different shelters what they need since they have direct knowledge of the communities they serve?
So I researched shelters online and noticed they had several ways to help, making a cash donation, volunteering and making in-kind donations. A lot of the shelters had a static list of generic items they needed on their website, things like toothpaste, soap, socks, etc... and several had a link to an Amazon Wishlist they created with specific items needed, priority and quantity requested.
That was the lightbulb moment for me! I was specifically researching homeless shelters and digging around for what they needed. Most people may not visit a shelter's website and discover their Amazon wishlist. My thinking was I could aggregate wishlists from different shelters and make it easy for people to browse a collection of items and purchase from Amazon! And because the shelters were the ones creating the wishlists, when a visitor purchased an item, Amazon would ship it directly to the shelter!
Planning the app
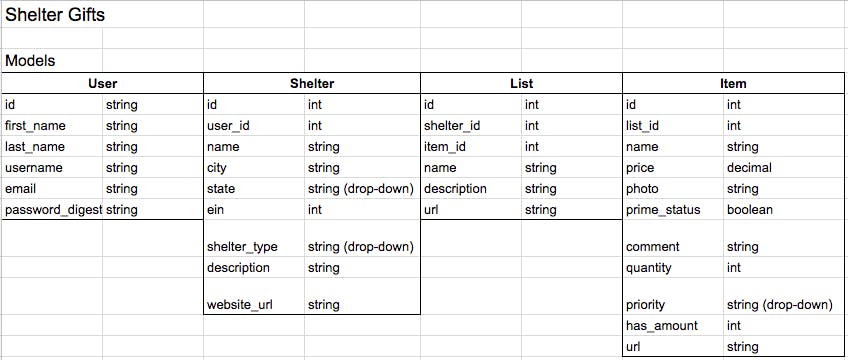
My first step was to plan as much of the app as I could before diving into the code. I started by imagining the app I wanted. How would it work? What would users and visitors be able to do? What would they see? Once I had a general idea of how I wanted the users (shelters) and visitors to interact with the app, I began mapping out the models and relationships.

Test Driven Development (TDD)
I decided for this app to implement test-driven development from the beginning with RSpec. I used the faker gem to generate fake data for the tests and the shoulda-matchers gem to write more readable relationship tests.
Overall, TDD was more fun than I thought it would be! Once I got the hang of using RSpec, faker and shoulda-matchers, it was fun to write the tests for what I wanted my code to do, then try to write the code. At first, it felt like I was doing more work upfront, but I can see how it saves time by helping you avoid bugs early on. I had a few instances where a test would not pass and I had to figure out why the code I thought would work didn’t! I’d much rather find and fix bugs like this in the initial stages rather than try to debug further in the development process.
Controller and Views
This part was relatively straightforward and fun because I had some assurances that my models and associations worked the way I wanted them to because of the testing. However, I did run into several issues that I did not anticipate in the beginning.
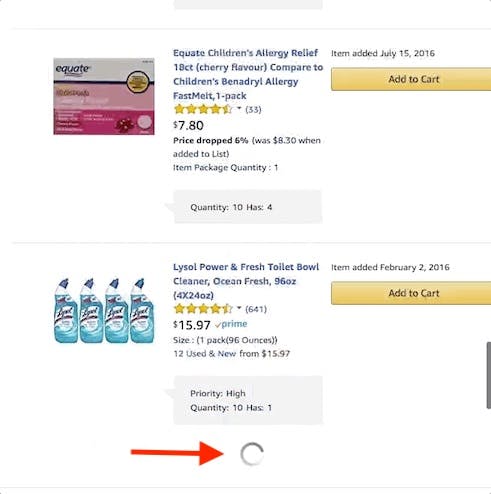
One of the biggest issues I faced was scrapping the items that were “lazily loaded” by Amazon on their wishlist pages.
Lazily-Loaded Items
When a shelter enters its wishlist URL and hits Create List, the app scrapes the page using Nokogiri. The problem I ran into after testing it out on a few wishlists was that only the first 10 items were being scraped and not all of the items on the list.
I could see all of the items on the wishlist page, so I wasn’t sure what the problem was at first. I refreshed the page and opened it in different browsers…. still nothing. It wasn’t until I scrolled down the page fast that I realized what was happening.

When you visit a wishlist page, Amazon only loads a portion of the items and only loads additional items as you get closer to the end of what is already rendered.
My next question was how does Amazon know when to send the next section of items? So I refreshed the page and opened the inspector to see the HTML for the first portion of the list.
It turns out that towards the end of the HTML for each lazily-loaded section, Amazon has:
a form with a hidden input named
showMoreUrlwith a link as a value anda separate link outside of that form with a class of
wl-see-more(watchlist see more) with the same link.

I visited that link and it was the next section of the wishlist; starting with the next item! I repeated this process until I got to the end of the list and discovered something similar. At the end of the list, Amazon included a div with an id of endOfListMarker.
With this knowledge, I could write a method to:
Scrape the wishlist page
Load the
showMoreUrlorwl-see-moreURL and scrapeSearch for the
endOfListMarkeron the page and repeat if not found
I tested it with a wishlist that had enough items to have several lazily-loaded sections. The results were inconsistent. Sometimes it would scrape the first two pages and other times the first three, but I often got 503 service unavailable errors with Nokogiri. After a few more attempts and refactoring, I decided to try the watir-scroll gem to mimic scrolling down the page so that the entire wishlist would load before scrapping. My thinking was that perhaps I was getting the 503 service unavailable errors because each time the method loaded a wl-see-more URL was another request to Amazon and perhaps they blocked too many back-to-back requests. I even tried Selenium and some JavaScript, but they all seemed too tacky and brittle.
There had to be a way! All of the information I needed was right there in the HTML. I decided to go back to my original approach. After doing some more research into Nokogiri, I specified the user agent and it worked!
I tested it on more wishlists and ran into some edge cases, mainly:
if an item was discontinued but still on a wishlist
if an item was still available but was out of stock with no ETA for restocking
I updated the method to account for these scenarios and it worked!
Deploying the app but controlling the items shown
The next major issue I faced was deploying the app and having others use it, but maintaining some control over the items that were shown on the homepage.
I wanted people to be able to visit the site and see a collection of items that shelters need and be able to purchase from Amazon. But I also wanted to demo the site to visitors and let them create a shelter and save a wishlist to see the functionality.
So that was the catch-22... how do I demonstrate the functionality to visitors but ensure that someone doesn’t save a list with inappropriate items that display on the homepage? After all, I wouldn’t want a potential employer or another dev checking out the app and seeing something bad!
I settled on having a function to delete items that were not verified! My ultimate goal for the app, once it’s launched, is to only allow verified shelters with valid Employee Identification Numbers to be able to signup and save a wishlist. But for now, my thinking was I could just create a shelter and save a wishlist myself, which would be verified, and let visitors do the same; just not expose a “verified” attribute!
I already had a List instance method named destroy, which deleted all of the associated items before destroying itself. I decided the easiest way to implement what I wanted would be to create a Shelter class method (reset-shelters) to do something similar, loop through a shelter’s lists and call the ‘list.destroy’ method, then have the shelter destroy itself.
# shelter.rb
def remove
  self.lists.each do |list|
    list.destroy
  end
  Shelter.find(self.id).destroy
end

def self.reset_shelters
  Shelter.all.each do |shelter|
    shelter.remove if !shelter.verified
  end
end
# list.rb
def destroy
  self.items.each do |item|
    item.delete
  end
  self.delete
end
The next step was to figure out how to call this method at certain intervals. I looked into cron jobs and options on Heroku but discovered a gem called rufus-scheduler (which is an awesome name by the way!).
The setup was very simple:
add the gem and bundle
create an initializer file in
config/initializers(scheduler.rb)require the gem at the top and add the following:
scheduler = Rufus::Scheduler::singletonadd a scheduler code block with the code you want to be scheduled
The syntax is easy to read and you can schedule code to run periodically or just once at a certain time.
I chose to reset the shelters to just the verified shelter that I created every 5 minutes with the following code.
# scheduler.rb
require 'refus-scheduler'

scheduler = Rufus::Scheduler::singleton

scheduler.every '5m' do
  Shelter.reset_shelters
end
I figured this would be enough time for a visitor to demo the app to get a feel for the functionality.
You can use the rufus-scheduler to run code at certain intervals based on seconds, minutes, hours, days, weeks, months… even years!
One thing to note with this gem is the scheduler will reset if the server restarts. So relying on a scheduler to run in a year or even monthly is risky!
Conclusion
Overall this was a very fun project to work on! It’s a great feeling to take an idea you’ve had for a while and bring it to life! To take something you’ve had stuck in your head and be able to create it and have others interact with it!
I plan to extend this app for my next project, by implementing a jQuery front-end and then on to React!
Feel free to check out the GitHub repo.

